
How to Break a Tire Bead at Home: Safe Methods
This post contains affiliate links. As an Amazon Associate, we earn from qualifying purchases.
How to break a tire bead at home starts with deflating the tire. Remove the valve core, then choose a method that matches the wheel size. Apply controlled force until the bead drops below the rim retainer. Note that sources disagree on pressure for small ATV tires: the HH-419 manual says 1 to 2 pounds can help stiffen the thin wall, while the BeadBuster and Hydraulic Technologies manuals require removing the valve core to fully deflate the tire.
Controlled force matters because a bead breaker works against a tight rim lip and the rubber sidewall. The tire construction changes the risk. A tubeless car tire can seal again with air, while a thin ATV sidewall tears if the tool slips. The next sections sort the methods by wheel size, tool fit, and safety.
What follows: eight common methods, two tool-fit tables, the ATV pressure exception, and the bead-reseating steps that finish the job.
Key Takeaways
- Remove the valve core first, except the HH-419 manual says 1 to 2 pounds can help small ATV tires.
- Stand to one side, because the U.S. Army manual warns a slipping tool can fly with enough force to kill.
- Check the rim lip depth (how far the tool reaches under the rim edge) before choosing a tool; the BeadBuster XB-450i needs 0.585 inch minimum.
- The U.S. Army manual lists four to five applications as typical for its bead breaker.
- Tubeless tires seal tighter against the rim, so the first application feels harder.
Safety First: The Bead Can Push Back
A tire looks dead flat, yet one trapped bead can still fight a pry bar with sudden force. The part you are fighting is the tire bead, the edge that seals against the rim.
Bead breaking separates the tire edge from the rim lip by forcing the bead bundle (the steel cord edge) below the rim retainer. Correct alignment, full deflation, and controlled force reduce the chance of sidewall puncture, rim damage, or tool slippage. The bead releases after repeated applications around the rim. One hard strike fails.
Before you start: Remove the valve core and confirm the tire is deflated. Stand to one side when applying force, because the U.S. Army manual says a slipping tool can fly with enough force to kill. Keep hands clear of rim flanges, because demounting tools press against them and can crush fingers.
I used to judge pressure by looking at the tire or pressing it with my thumb. Tires can look fine while sitting several pounds per square inch low. Now a gauge comes out every time, because looking tells you almost nothing.
Safety rules are short. Follow the tool manual.
- Wear eye, ear, and foot protection. The HH-419 manual lists all three.
- Wear safety glasses at all times around a hydraulic bead breaker. Hydraulic Technologies says so.
- Let only trained professional technicians use a hydraulic bead breaker. Hydraulic Technologies says so.
- Use only Power Team hydraulic fluid in that tool. Never use brake fluid or transmission oil.
- Keep hardwood blocks under any jack, and crib the tire and wheel on the other side. The U.S. Army manual gives that rule.
- Don’t hammer an inflated or partially inflated tire and rim assembly.
- Don’t seat rings by hammering an inflated tire.
- Remove the bead seat band slowly to protect your toes.
- Stand clear when using a cable or chain sling.
- Read the tool manual before operating.
- Use the tool only for bead breaking.
- Don’t let anyone mount or demount tires without proper training.
A slipping hydraulic unit makes a deep, low groan as pressure builds. It can make a sharp metallic clack if it slips off the flange. That sound is your cue to stop.
Which Method Matches Your Tire?
Match the method to wheel size, sidewall thickness, and how much room you have around the rim. The table below sorts common do-it-yourself methods by fit and risk.
| Method | Best For | Watch Out |
|---|---|---|
| Vehicle weight | Large tire on a board | Hard to control |
| High-lift jack | Bead lever with blocks | Jack can slip |
| C-clamps | Small wheels, slow force | Many repositions |
| Sledgehammer | Sturdy steel wheels only | Damages rims |
| Bottle or scissor jack | Low-profile tire with support | Needs stable blocks |
| Bead breaker tool | Repeated home jobs | Needs correct fit |
Improvised methods are messy. They can work, but they demand patience. A sledgehammer on an alloy wheel leaves cosmetic damage fast. A high-lift jack needs solid blocking, not a driveway full of hopes.
For a one-time passenger tire, C-clamps or a scissor jack with boards need the fewest special tools. For repeated jobs, a bead breaker tool wins. For alloy wheels, I would skip the sledgehammer.
Tubeless tires seal tighter than tubed tires. That means the first bead break feels harder. Tubed tires are easier once the tube is out, but a pinched tube can tear and make reseating slower.
Once the bead is free, the next task is tire removal. If you are working on a beadlock wheel, remove the ring bolts first. The clamped ring blocks tool access and changes the order of the job.
Step-by-Step: How to Break a Tire Bead at Home Without a Machine
Three things decide the job: air, alignment, and force. Start flat.
Deflate, Lube, and Set the Tire
- Remove the valve core (the small air valve inside the stem). If you skip this, the tire can store pressure and release it as the bead moves. Insert a thin piece of wire through the valve stem to confirm the passage is clear.
- Mark the tire as tubed or tubeless. If a tube is inside, remove it before forcing the bead. A pinched tube can tear and complicate reseating.
- Place the tire on a board or hardwood block. Without a board, the tire can roll, and your hands can land on the rim edge.
- Lubricate the tire with BeadBuster Tire Lube or soapy water. Dry rubber grabs the rim lip, so the tool needs more force and slips more. Soapy water smells faintly sweet and makes the rubber slide with a wet hiss.
Apply Force in Stages
- For a BeadBuster XB-450i, press the feet between the tire and rim. Use the handle to aid foot positioning. Press down on the sidewall to create a gap.
- Tighten the Clamp Bolt with a 3/4 inch socket or wrench. The BeadBuster XB-450i operator’s manual says to tighten until the tool is vertical and the body touches the rim. Make sure the feet are fully inserted.
- Check alignment before running down the Ram Bolt. The tool body must be within 1/8 inch of the rim edge. It must also be roughly perpendicular to the rim face.
- Run the Ram Bolt slowly until the bead moves past the bead retainer (the rim lip that holds the bead). Don’t run it past the point where the flange head contacts the tool body. That can strip the threads.
- Stand to one side. The Ram Bolt gives a gritty, incremental feel as the foot presses the bead under the rim lip.
- If the bead stays seated, advance the tool a few inches around the rim and apply it again. Most tires won’t completely break on the first application.
If you plan to finish the job with a manual tire changer, break the bead first so the rim lip is clear. Tire spoons work better after the bead is loose, but they struggle against a sealed bead.
What If the Bead Won’t Break?
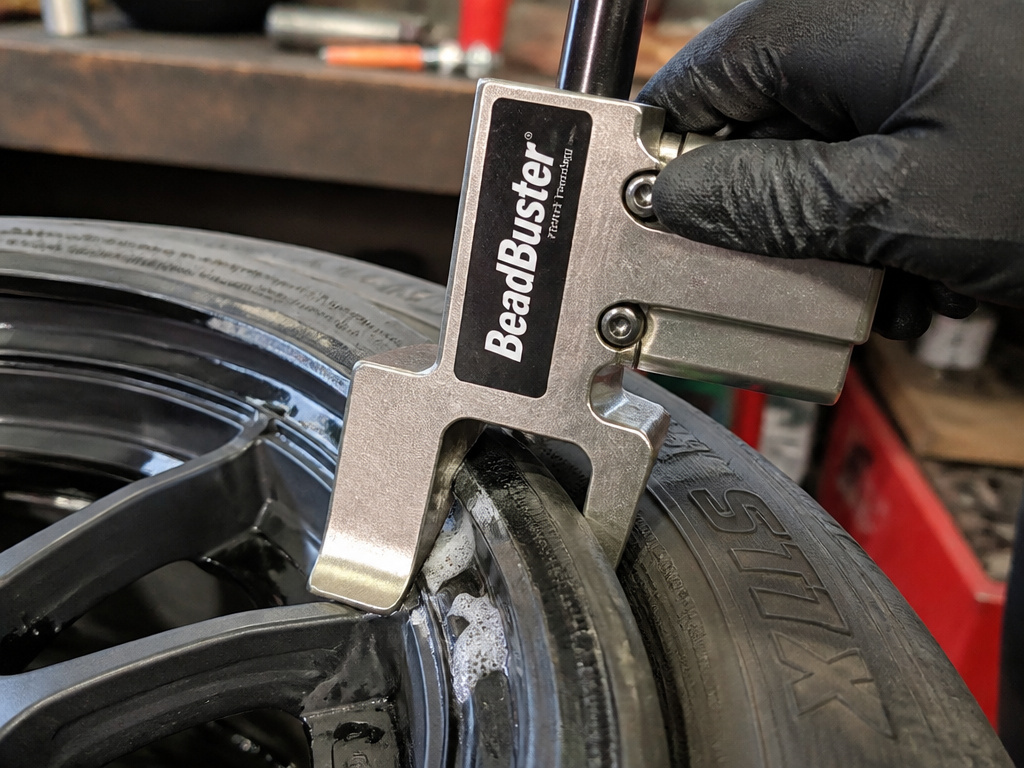
Four to five applications are typical with the U.S. Army bead breaker, so one failed attempt is normal. Realign first.
A peer-reviewed engineering journal article identifies bead breaking as the most difficult part of repairing a tire. That matches what these manuals treat as the hard step.
Try These Fixes in Order
- Check alignment. If the tool isn’t roughly perpendicular, stop and realign before applying force.
- Add lubricant. The BeadBuster manual recommends BeadBuster Tire Lube or soapy water.
- Move the tool a few inches around the rim, then repeat. The BeadBuster manual says most tires won’t completely break on the first application.
- For the U.S. Army tool, move about 90 degrees around the rim for repeated applications. Slant the demounting bead tool about 10 degrees to keep it firmly in place.
- For the HH-419, use a tire iron to separate the tire from the rim if the jaws need more room to insert.
- For small ATV tires, the HH-419 manual says 1 to 2 pounds can help stiffen the thin wall.
I always check the DOT (Department of Transportation) date code on a tire before judging anything else. A tire with great tread can still be old enough that I would hesitate.
Easy to miss: The BeadBuster ram bolt can strip threads if run past the flange head contact point. The tool will feel tighter, then the threads will feel loose on the next adjustment.
Forcing a misaligned tool is like pressing garlic with too much wrist. The mess happens where you least expect it. Stop, realign, and use smaller bites.
Tool Specs That Decide Fit: BeadBuster, HH-419, and Hydraulic Units
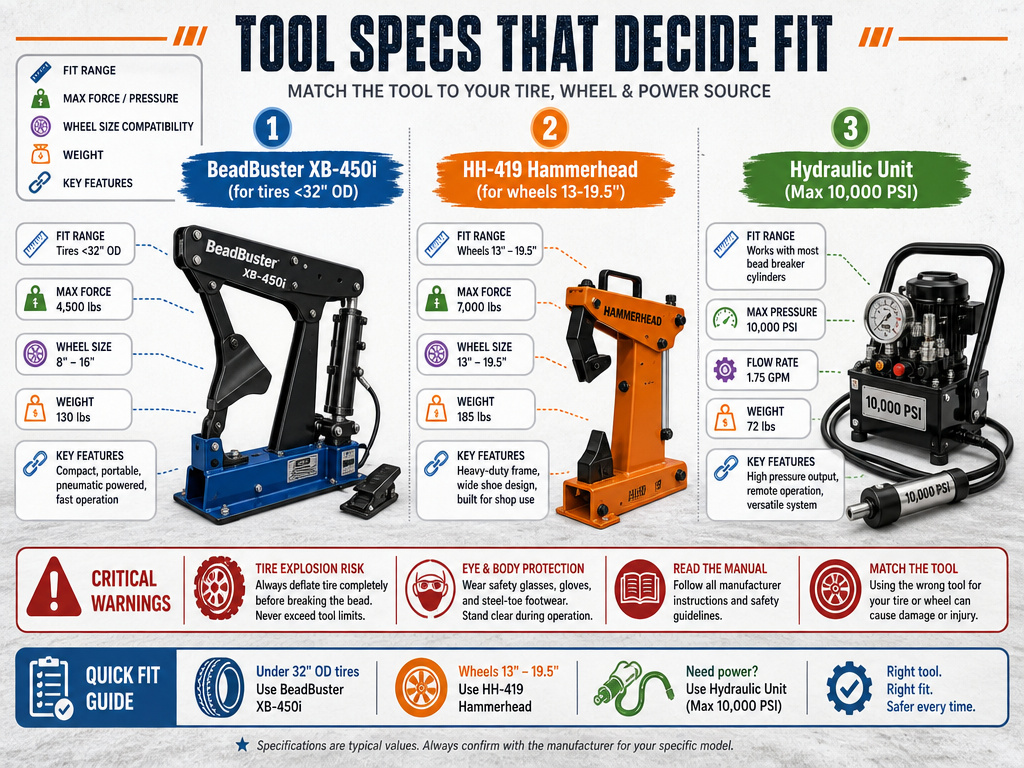
The BeadBuster XB-450i is designed for most tires less than 32 inches OD (outside diameter). Fit matters.
| Tool | Key Fit Specs | Critical Warning |
|---|---|---|
| BeadBuster XB-450i | Tires under 32 inches OD | No hammer use |
| HH-419 Hammerhead | Wheels 13 to 19.5 inches | Jaws must bite first |
| Hydraulic unit | Max 10,000 psi (700 bar) | Trained operators only |
| U.S. Army tool | 4 to 5 applications | Stand to one side |
BeadBuster XB-450i Fit Rules
The minimum rim lip depth is 0.585 inch. Smaller rim lip profiles, such as 7-inch to 8-inch ATV wheels, require the accessory spacer PN (part number) BB1-SPCR. The tool also needs a rim lip that the Ram Foot can reach under. The Ram Foot must cover the bead bundle without hitting the bead seat (the rim surface the tire rests on) or bead retainer.
The standard clamp arm can’t grip those surfaces well. The extended arm reaches deeper into the rim.
If I had a tire under 32 inches OD, I would use the BeadBuster XB-450i. It needs enough rim lip depth. Product page on Amazon can help compare accessories.
HH-419 Hammerhead Fit Rules
Tire Service International makes the HH-419. It is designed for alloys, steel, painted, or polished wheels. The HH-419 is designed for wheels 13 to 19.5 inches. The optional extension leg PN HH-419-E extends the range to 24.5 inches. The optional ATV foot accessory covers 4 to 12 inches.
The HH-419 Hammerhead bead breaker manual gives two instructions that other manuals reject. It says a rubber mallet is allowed to drive the jaws down. It also says 1 to 2 pounds can help stiffen small ATV tires.
If I had to choose one tool for mixed 13-inch to 19.5-inch wheels, I would look at the HH-419 Hammerhead first. Check availability.
Hydraulic and Army Tool Notes
The Hydraulic Technologies bead breaker has a maximum pressure of 10,000 pounds per square inch, or 700 bar, a metric pressure unit. The unit weight is 27 lbs (12.2 kg). The Hydraulic Technologies bead breaker instructions say to use only Power Team hydraulic fluid. They also say only trained professional technicians familiar with the equipment should use it.
If the tool isn’t aligned perpendicular to the rim, release it and adjust before continuing.
The U.S. Army bead breaker uses a different rhythm. The U.S. Army technical manual TM 9-4910-595-14&P says to move about 90 degrees around the rim for repeated applications. It lists four to five applications as typical.
The manuals don’t agree on two points. Follow the manual for the tool you own.
- Hammer use: BeadBuster says don’t use a hammer to force the tool in place. The HH-419 says a rubber mallet is allowed.
- Tire pressure: BeadBuster and Hydraulic Technologies say to remove the valve core and deflate. The HH-419 says 1 to 2 pounds can help stiffen the thin wall.
Re-Seating the Bead and Finishing the Job
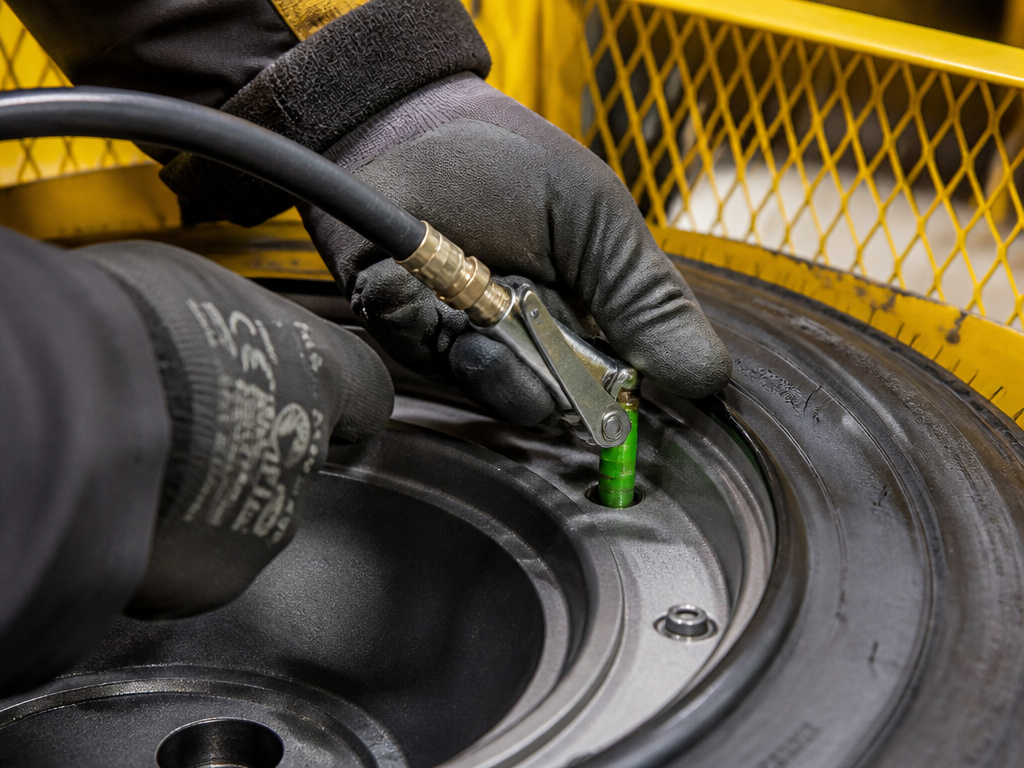
A popped bead is only half the job. Finish it right.
Before inflation, check that all side rings and lock rings are in place. The U.S. Army manual says don’t inflate a tire before those rings are installed. After inflating to approximately 5 psi, check the components again. Inflate in a safety cage or use safety chains.
Never sit on or stand in front of a tire and rim assembly that is being inflated. Use a clip-on chuck and a long enough hose to stand to the side.
Air pressure can push a damaged lock ring out of place. Replace cracked, broken, or damaged rim parts.
Don’t overload or overinflate the tire and rim assembly. Use rims sized for the job. Check the manufacturer before mixing rim parts. If rim mating is unclear, ask a wheel and rim expert.
I would not call a mounting process complete unless it includes a clean bead seat, correct lubricant, and new valve stems or service kits. Reusing old valve stems and TPMS seals is a shortcut that can show up as slow leaks later.
Touchless mounting machines still need a careful operator. The operator still decides the result.
After the repair, you still need to mount a tire and seat it. If you cannot seat a bead after inflation, stop and check alignment before adding more air.
Check the date code. An aged sidewall can lose the grip needed for a tight seal.
How to Break a Tire Bead with a Car
Using a vehicle’s weight is a common improvised method. The goal is to apply focused pressure right at the bead seat. You can carefully drive a vehicle’s tire onto the sidewall of the flat tire, positioning it close to the rim’s edge. Alternatively, you can place a sturdy board across the tire’s sidewall and lower a vehicle onto it using a jack. Always ensure the wheel is securely blocked to prevent rolling. Remember to first remove the valve core to fully deflate the tire. This method requires caution to avoid damaging the rim or losing control of the vehicle.
How to Use a Hi-Lift Jack as a Bead Breaker
A high-lift jack can generate the focused force needed to break a bead. Position the jack’s base on solid ground and use a sturdy block of wood on the tire’s sidewall, placing it as close to the rim as possible. The jack’s lifting point should press against this block. Operate the jack handle slowly and steadily to apply downward force directly onto the bead area. Stand to the side while applying pressure for safety. As with any method, the tire must be completely deflated by removing the valve core before you start. This technique works best on larger tires where you have sufficient clearance.
Breaking a Tire Bead with a Hammer
Using a hammer directly on a tire bead is not generally recommended and can damage the rim. Sources disagree on using a hammer/mallet to assist a bead breaker tool: the HH-419 manual says a rubber mallet may be used to drive the jaws down, while the BeadBuster XB-450i manual explicitly warns DO NOT USE A HAMMER TO FORCE THE TOOL IN PLACE. If attempting this, you must use a protective block of wood against the tire sidewall near the rim edge to focus the blow and prevent direct metal-on-metal contact. Always wear eye protection. The tire should be fully deflated first.
Frequently Asked Questions
What is the easiest way to break a tire bead at home?
Bead breaker tool is easiest for repeated jobs. The BeadBuster XB-450i uses a 3/4 inch socket or wrench to clamp the tool and run down a Ram Bolt. Improvised jacks and straps can work, but they need stable blocking and controlled force.
Can you break a tire bead using C clamps?
Yes. C clamps can press the bead under the rim lip when used with boards and slow, repeated tightening. They are slower than a bead breaker, and they need careful alignment to avoid slipping.
What can I do if my tire bead won’t break?
Check alignment, add lubricant, and move the tool a few inches around the rim. The BeadBuster manual says most tires won’t completely break on the first application. The U.S. Army manual lists four to five applications as typical.
How do you loosen a tire bead before demounting?
Remove the valve core and deflate the tire. Then lubricate the bead area with BeadBuster Tire Lube or soapy water. For small ATV tires, the HH-419 manual says 1 to 2 pounds can help stiffen the thin wall.
Is bead breaking harder on tubeless or tubed tires?
Tubeless tires seal tighter against the rim, so the first application feels harder. Tubed tires are easier once the tube is removed, but the tube can pinch and tear if the bead slips.
Before You Go
Before you decide how to break a tire bead at home, check the wheel size and tool fit. If the rim lip depth is under 0.585 inch, the BeadBuster XB-450i needs the accessory spacer or another method.
Start with the valve core. Remove it, verify deflation, and keep your body to one side. If the tool isn’t roughly perpendicular, stop and realign before applying force.
Small ATV tires are the exception that forces a decision. The HH-419 manual allows 1 to 2 pounds of pressure, while other manuals require full deflation. Follow the manual for the tool you own.
Check the date code. If the tire is old enough to replace, bead breaking won’t fix that.
