
How to Find a Slow Leak in a Tire: Step-by-Step
This post contains affiliate links. As an Amazon Associate, we earn from qualifying purchases.
How to find a slow leak in a tire starts with cold pressure. Inflate to the placard value (pressure label), then check the valve, bead, tread, and wheel with soapy water. USTMA, the tire industry group, lists normal passenger and light truck loss at 1 to 2 psi monthly; NHTSA, the safety agency, lists 1.0 to 1.5 psi monthly.
CHAOS Moto says a soft tire may not push enough air through a tiny leak to make bubbles. NHTSA says pressure changes 0.8 psi for every 10 degrees F, so a reading looks low without a puncture.
Next, the checks run in order: pressure, spray points, bubble reading, valve stem, bead, tread, and the repair decision. Each step names what to look for and when to stop.
Key Takeaways
- Check the valve first. A leaking valve can mimic a slow leak.
- Use cold pressure for testing. Tires are cold after 3 hours parked or less than 1 mile driven.
- Watch for growing bubbles. First spray foam settles; a real leak keeps building.
- Do not trust sealant as a repair. Goodyear says sealants are temporary and need manufacturer guidance.
- Dismount for a proper repair. A plug alone or patch alone is improper.
The Five Places a Tire Loses Air
Five points cause most slow leaks. Start with the bead and valve core. Then check the TPMS stem, tread, and wheel. TPMS means tire pressure monitoring sensor.
Technical note: Confirm a slow leak when bubbles keep forming at one point after the first spray foam settles. Inflate the tire to cold pressure, then spray the valve, bead, tread, and wheel. Use a soap solution, and let the spray sit before reading bubbles. Mark the source with a tire crayon before drying, and recheck the assembly after repair.
Inflate to cold pressure before spraying. The NHTSA warning system bulletin defines cold tires as parked for 3 or more hours, or driven less than 1 mile. It also says pressure changes 0.8 psi for every 10 degrees F.
- Bead: bubbles trace one arc along the rim.
- Valve core: a bubble keeps forming at the opening.
- Valve stem or TPMS stem: a ring appears at the base, or bubbles form at a crack.
- Tread: steady bubbles sit over a nail, screw, or cut.
- Wheel: pinpoint seeps or a line along a crack show the metal is the path.
If all five points look clean but pressure drops, review common causes of air loss before buying another can.
The bead
A bead leak sits where the tire edge meets the wheel.
The valve core
The valve core is the small pin inside the valve stem.
The tread puncture
A puncture shows steady bubbles over a nail, screw, or cut.
Which Bubble Means a Real Leak?
A bubble that keeps growing at one point is a leak; spray foam that fades is not.
CHAOS Moto says a soft tire may not push enough air to show a slow leak. The first light foam settles flat. A real leak keeps pushing a small dome at the same point.
| Leak point | Bubble cue | Next check |
|---|---|---|
| Valve core | Bubble at the opening | Spray again after marking |
| Bead | Bubbles along one arc | Inspect the rim seal |
| Tread | Steady bubbles at a nail or cut | Mark for internal repair |
| Wheel | Pinpoint seeps or a crack line | Demount for inspection |
For a repeatable bench check, use a low-foam tire leak detector. A low-foam formula stays flat until air moves through it.
Why Is the Valve Stem the First Check?
The valve assembly is the easiest leak to confirm and the easiest to fix wrong.
Apply soapy water to the valve stem. If bubbles form at the base, the valve stem is the first suspect.
Road salt leaves a white, powdery oxidation buildup on a TPMS metal stem. The NHTSA technical service bulletin says that buildup can cause a poor seal and a slow leak.
The bulletin’s fix removes the tire, discards the grommet (rubber seal), cleans oxidation, and installs a new grommet. It torques the valve stem nut to 4 N.m (3 lb-ft) and warns against over-torque. The procedure wipes off excess sealant before mounting.
After a TPMS stem leak repair, the bulletin says not to wash the vehicle for 16 hours so the sealant can cure.
If the stem looks clean, the bulletin says to replace the sensor.
How Do You Read a Bead Leak?
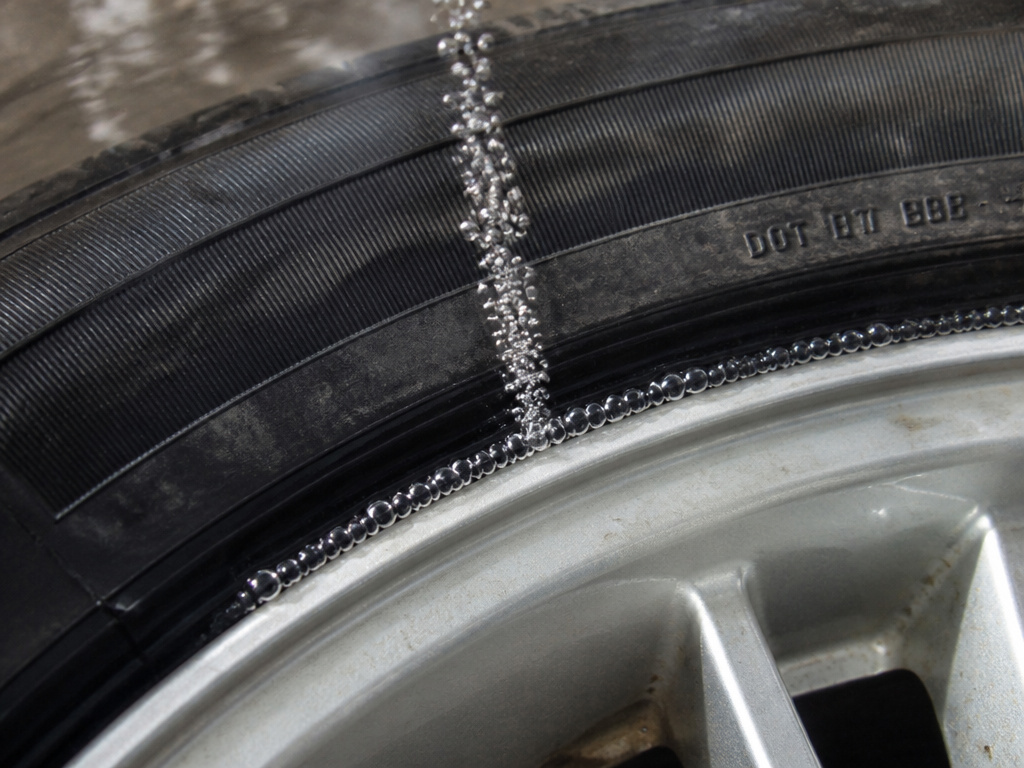
One continuous arc of bubbles along the rim is the tell.
A bead leak sits where the tire edge meets the wheel. When bubbles trace that line, treat it as a tire bead leak.
CHAOS Moto describes a bead leak as small bubbles building along one arc. The bead line looks like a thin string of bubbles, not a burst.
Don’t call it a puncture until you rule out the bead. A dirty rim lip or uneven seating keeps air from sealing.
How to Find a Slow Leak in a Tire: The Escalation Path
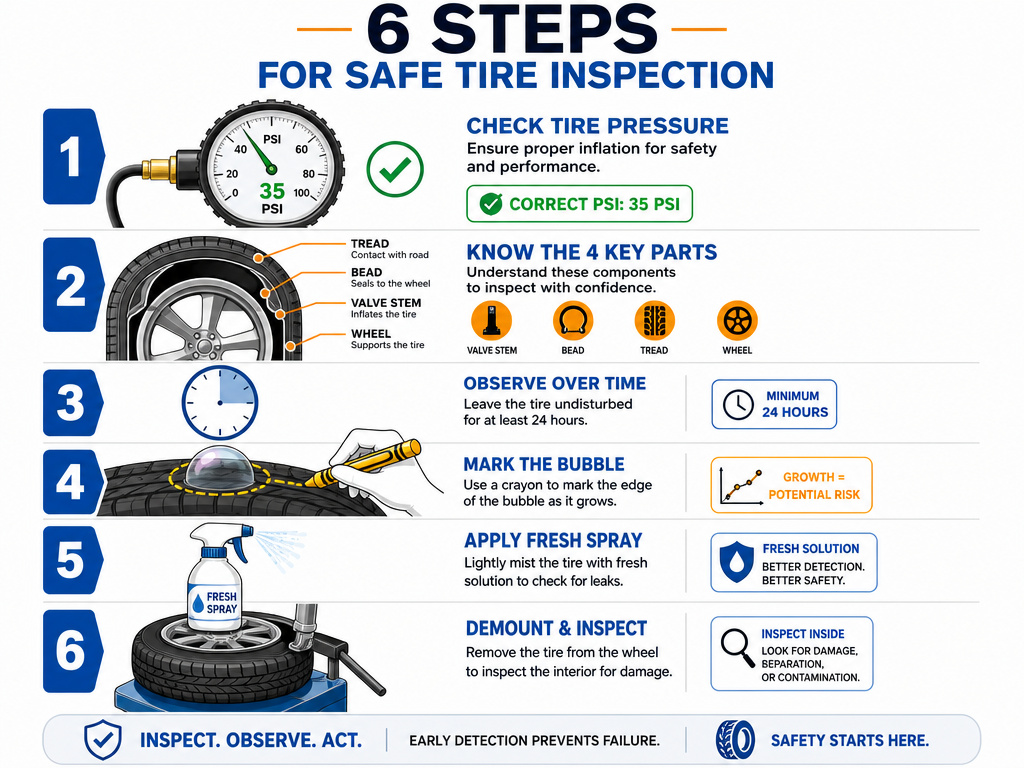
You spray every point, wait, and see nothing. The tire still drops pressure by morning.
Before any spray test, check tire pressure when the tire is cold.
Don’t inflate above the placard pressure to hunt a leak. CHAOS Moto says inflate to the specified pressure, not beyond it.
Before you start: Work on a cool, inflated tire; a hot tire shows 3 to 5 psi higher after several miles.
- Inflate to the placard cold pressure. A soft tire may not push enough air through a tiny leak to show bubbles.
- Spray the valve, bead, tread, and wheel in that order. Skipping a point leaves a common leak path unchecked.
- Wait. A slow leak takes a little while to show, while spray foam fades.
- Mark the growing bubble with a tire crayon (a marking pen) before wiping the area dry. Without a mark, the source moves or is lost.
- If nothing shows, re-spray each point with fresh solution. Chasing one wet spot wastes time and hides the real leak.
- If pressure still drops, stop DIY and demount for internal inspection. A hidden sidewall or bead problem stays invisible from the outside.
AutoZone’s DIY guide lists submerging the wheel as a last resort, while CHAOS Moto’s spray-on method avoids the dunk tank. Industry sources (USTMA, Goodyear, NHTSA) do not endorse either consumer method and prescribe a professional inspection with a soap solution prior to demounting.
If the wheel shows alloy wheel corrosion, the spray reveals a thin line along the metal. More than once, I’ve had to look past the tire when a complaint turned out to be a balance issue or a bent wheel.
Professional shops use a soap solution, then demount when the leak hides. The USTMA tire care manual lists tread conditions that remove a tire from service, including cuts, cracks, bulges, and unrepairable punctures.
What Does the Repair Standard Say?
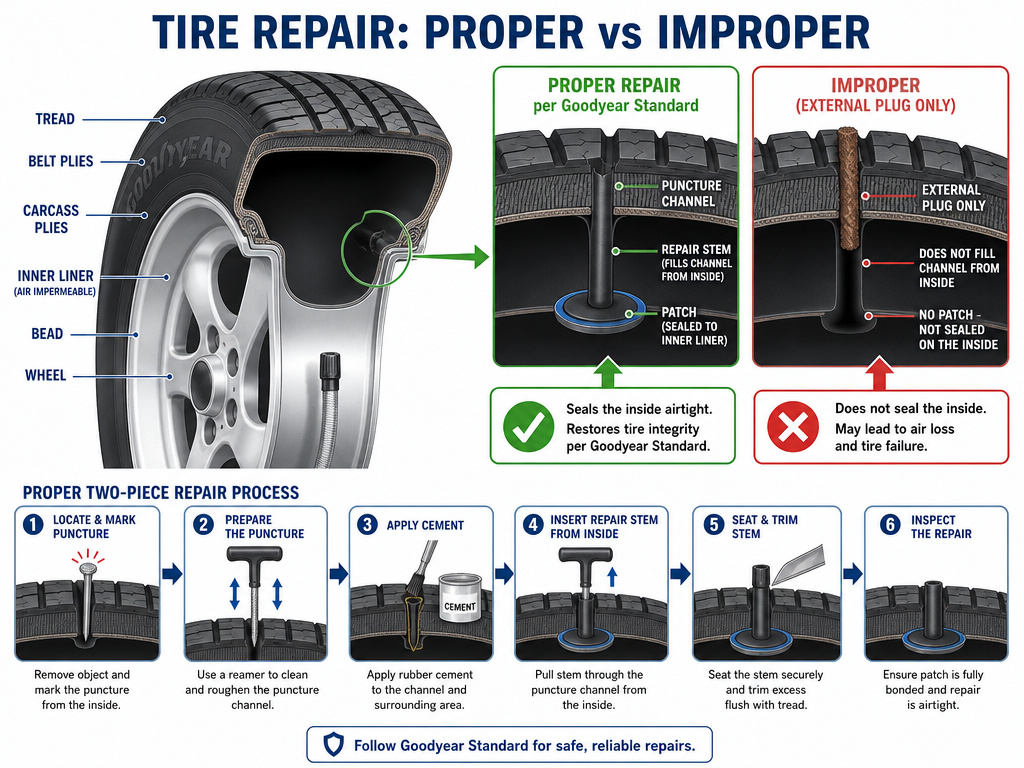
Goodyear’s repair standard is clear: the tire comes off the wheel.
A roadside tire plug gets you to a shop, but it isn’t a proper repair. A proper internal tire patch seals the liner and fills the channel.
Goodyear’s bulletin says never use only a plug and never use only a patch. It limits puncture repairs to injuries no larger than 1/4 inch (6mm). It bars repairs on tires worn to 2/32 inch remaining tread depth.
If the injury angle exceeds 25 degrees, the bulletin calls for a two-piece repair system. For speed-rated tires (tires with a speed symbol), contact the tire manufacturer for its repair policy and whether the speed rating is retained.
Sealant is the one place consumer advice and repair standards disagree. AutoZone’s DIY guide lists a stop-leak product as a last resort when a leak is hard to find, while Goodyear and USTMA treat sealants as temporary mobility aids, not proper repairs. They also warn that sealant complicates inspection for under-inflation or overload damage.
Aerosol tire sealant seals temporarily for a short time, but it isn’t a proper repair. If sealant remains inside, Goodyear says contact the tire or sealant manufacturer before repair.
| Repair option | What it does | Who backs it |
|---|---|---|
| Aerosol tire sealant | Seals temporarily and allows driving to a shop | AutoZone DIY guide lists it as a last resort |
| Plug only | Fills the tread hole from outside | Goodyear says it is an improper repair |
| Two-piece stem and patch | Fills the channel and seals the inner liner | Goodyear and USTMA repair standard |
If the shop moves sensors, it should use an appropriate tire pressure sensor activation tool.
- Don’t drive on a plug-only repair. The liner isn’t sealed, and Goodyear says improper repairs can fail in service.
- Don’t use a homemade soap mix as the final check. Suds cover the wheel and hide a small leak.
- Don’t ignore a 2 psi drop monthly. USTMA puts normal loss at 1 to 2 psi; NHTSA puts it at 1.0 to 1.5 psi.
How to Find a Leak by Submerging a Tire in Water
When a soapy water spray does not reveal the source of a slow leak, some DIY guides suggest submerging the tire and wheel assembly in a tub of water. This method is considered a last resort before seeking professional service. Inflate the tire to its specified pressure first, as a soft tire may not push enough air to show a leak. Completely submerge the inflated assembly and watch closely. A slow leak can take time to become visible, so watch for a steady stream of small bubbles forming from a single point. If you find the leak, mark the spot immediately before drying the area. Industry sources do not endorse this method for a proper repair, as a professional internal inspection after removing the tire from the rim is required.
Frequently Asked Questions
How to find a really slow tire leak?
Inflate to cold pressure, then spray the valve, bead, tread, and wheel. Wait for a bubble that keeps growing at one point. If nothing appears after two clean re-sprays, demount for internal inspection.
Why is my tire losing air but I can’t find a leak?
The common suspects are the valve stem, bead seal, wheel porosity, or a hairline crack. NHTSA also lists road-salt oxidation on a TPMS stem. Goodyear requires internal inspection because hidden damage stays invisible from the outside.
What can I spray on a tire to find a leak?
Use a soap solution or a low-foam tire leak detector. A trigger-sprayer works on the wheel, so you check each point without a dunk tank. Mark any growing bubble before wiping the area dry.
Can I drive with a slow leak in my tire?
Only a short distance to a shop if the tire holds enough pressure to drive safely. Goodyear warns that under-inflated tires may have hidden damage and a zipper rupture. If the tire is soft, inflate it or use another method before driving.
Is a tire sealant enough for a slow leak?
No. Goodyear and USTMA call sealants temporary mobility aids, not proper repairs. AutoZone’s DIY guide lists a stop-leak product as a last resort, but the repair standard requires an internal inspection and patch-plug repair.
The Bottom Line
If you want the short answer on how to find a slow leak in a tire, work cold, spray low, and wait. The leak tells itself by a bubble that keeps growing at one point.
One rule most guides skip: if the tire loses more than the top of the normal range (2 psi per month according to USTMA or 1.5 psi per month according to NHTSA), stop treating it as normal. USTMA lists passenger and light truck loss at 1 to 2 psi monthly, while NHTSA lists 1.0 to 1.5 psi. Above these ranges, you need a source.
Make this week’s first step simple: check the valve stem with soapy water, then the bead arc. If those are clean and pressure still drops, demount for internal inspection.
Numbers first, marketing later.
