
Wheel Offset Explained: The Specs That Decide Fitment
This post contains affiliate links. As an Amazon Associate, we earn from qualifying purchases.
Wheel offset is the distance, measured in millimeters, between the wheel’s centerline and the wheel-to-rotor mounting surface. Stamped as ET (Einpresstiefe), it determines whether the wheel tucks inward toward the suspension or pokes outward toward the fender. A mismatch, per a 2019 NHTSA bulletin, can cause the wheel to contact the brake caliper, introducing stress that could crack the rotor.
That gap between the mounting pad and the centerline is where all the fitment math lives, and it’s where wheel offset explained truly matters. It’s not an abstract design choice. Get it wrong, and you are measuring damage, not style.
What follows: the official definitions from DIN and ISO, how to measure what you have, the precise interaction between offset and wheel width, and the real clearance consequences that spec sheets leave out. By the end, you’ll read an ET stamp and know exactly where that wheel will sit.
Key Takeaways
- Wheel offset (ET or Einpresstiefe) is measured in millimeters from the hub face to the wheel’s centerline, defining its inboard/outboard position.
- For reputable wheels, offset is measured per SAE standards with a tolerance typically within ±1 mm — a small number with large consequences for clearance.
- Changing wheel width alters inner and outer clearance even if offset stays the same; a wider wheel pushes both sides equally from the hub.
- The NHTSA documents that incorrect offset can cause wheel-to-caliper contact, leading to rotor stress and potential failure.
- Always verify fitment by checking the door jamb placard and using a reliable calculator, then physically test for clearance at full steering lock and suspension compression.
What Is Wheel Offset?
Lay a wheel face-down on a flat surface. Run a straight edge across the back lip. The gap between that straight edge and the hub mounting pad is the raw measurement you need. The centerline is exactly halfway between the wheel’s inner beads. The offset is the difference between those two points.
It’s a German standard, literally. ET stands for Einpresstiefe, or “insertion depth,” and the measurement is defined per DIN 7817, the standard governing wheel rim dimensions. The international standard ISO 3911:2021 covers the same vocabulary. This isn’t marketing. It’s a dimensional spec printed on the back of every real wheel.
Wheel offset is the distance in millimetres from the wheel’s hub mounting surface to the geometric centreline of the rim. A positive offset (e.g., ET+45) places the hub face toward the outer side; a negative offset (e.g., ET-12) places it toward the inner side. Zero offset means the hub face is exactly at the centreline.
The stamp on the back of the wheel tells the story: “18×8.5J ET35”. The 18 is the diameter, the 8.5 is the width in inches, and the ET35 is the offset—35mm of positive offset, a key part of the wheel offset explained concept. If that number were ET-15, the wheel would sit 50mm further outward on the same hub. That’s two inches of visual change from a 50mm shift.
Positive, Zero, and Negative Offset Explained
You have three directions the hub face can go relative to the centerline. Each moves the entire wheel in a different way.
Positive offset is the default for most modern front-wheel-drive cars and crossovers. The hub mounting surface is outboard of the centerline. This pulls the wheel and tire assembly inward, toward the suspension. It packages everything tightly inside the wheel well. A high positive offset, like ET+55, is common on economy cars.
Zero offset means the hub face is exactly on the centerline. The wheel’s centerline aligns directly with the steering axis. It’s simple, but it’s rare on factory passenger vehicles. You see it more on custom applications or specific off-road wheels.
Negative offset pushes the hub face inboard of the centerline. This forces the wheel outward, away from the suspension. It’s the look of “poke” and is common on trucks, older rear-wheel-drive cars, and aggressive street builds. A deeply negative offset dramatically changes the steering scrub radius.
| Offset Type | Hub Face Position | Common Use Case | Visual Effect |
|---|---|---|---|
| Positive (ET+) | Outboard of centerline | Modern FWD cars, crossovers | Wheel tucks inward |
| Zero (ET0) | At the centerline | Custom, some off-road | Centered stance |
| Negative (ET-) | Inboard of centerline | Trucks, classic RWD, aggressive fitment | Wheel pokes outward |
The choice between positive and negative offset isn’t just aesthetic, a nuance often clarified when the wheel offset explained. It changes where the tire loads the wheel bearing and how the steering feels. More on that in a moment.
How Offset and Width Interact (This Is Where People Get Burned)
A wheel’s width is measured from inside bead seat to inside bead seat. The centerline is half of that width. When you change the width, you change the location of both the inner and outer bead seats relative to the fixed hub face.
The important point is this. If you go from an 8-inch wide wheel to a 9-inch wide wheel and keep the same ET+35 offset, the outer lip doesn’t just move out. The inner lip moves in by the same amount. Half of the extra inch goes outward, half goes inward.
Common mistake: Choosing a wider wheel with the same offset and only checking fender clearance. The inner barrel often contacts the strut or brake caliper first.
The ISO 4000-2:2013 standard provides the calculation. Rim width (dimension A) is the width code multiplied by 25.4 and rounded to 0.5 mm. For a 9.0J wheel, that’s 9.0 * 25.4 = 228.6 mm. The centerline is at 114.3 mm from the inner bead. With an ET+35, the hub face is 35mm outboard of that line. This puts the inner barrel 149.3mm from the hub face. On an 8.0J wheel with the same ET+35, the inner barrel is only 134.9mm from the hub. That’s 14.4mm—over half an inch—less inner clearance.
I’ve seen this firsthand. A friend ordered wider wheels for his sedan, matching the offset from his stock setup. They looked great sitting still. At full steering lock, the inner sidewall whispered against the spring perch. A week of driving in the rain wore a smooth, shiny groove into the rubber.
The Real-World Consequences of Wrong Offset
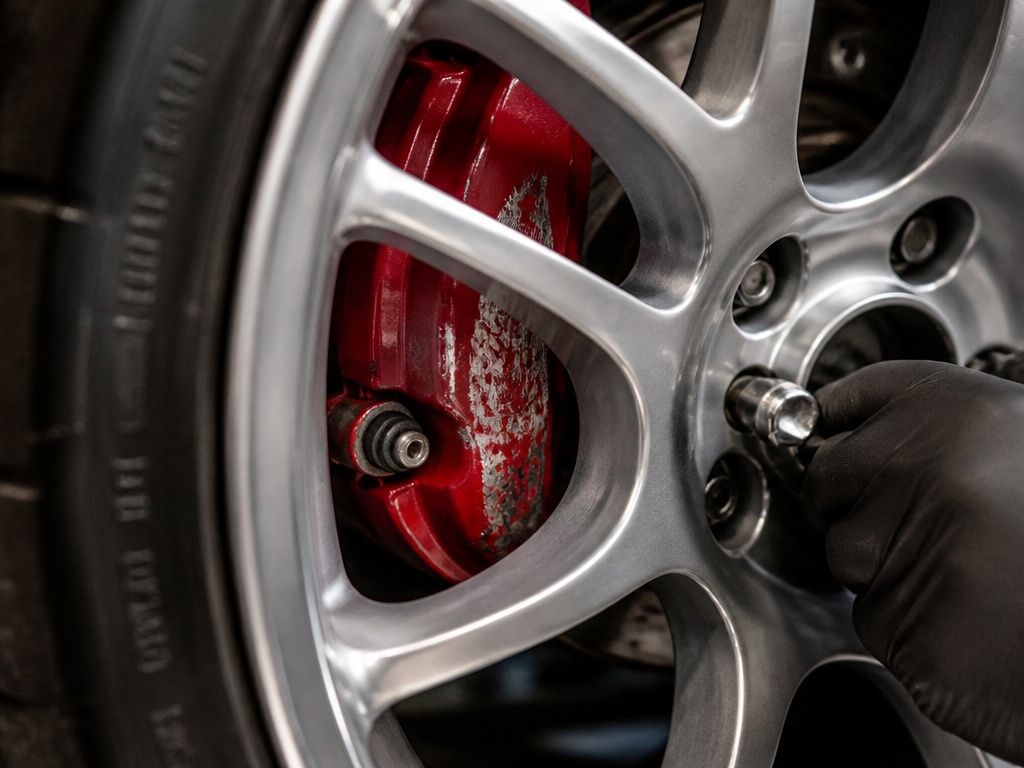
This isn’t scare talk. It’s documented. The NHTSA technical service bulletin (L-TT-0257-19) is explicit: “Installation of a wheel with an offset or width different than the correct specification… can cause damage to brake components due to interference.”
The bulletin notes that some models have front and rear wheels with different offsets that look identical. Swapping them can cause the wheel to contact the brake caliper. That contact introduces stress, which “could contribute to cracking or separation of the brake rotor.” The recommended fix is to replace the damaged rotor.
Beyond catastrophic failure, wrong offset changes the vehicle’s dynamics. The Wikipedia wheel sizing entry explains it well: offset changes the lever-arm length between the tire center and the steering knuckle. This alters steering torque feedback, leading to heavier steering, less returnability, or bump steer. Also, “the wheel bearings will see increased thrust loads if the wheel centerline is moved away from the bearing centerline.”
Kia’s owner manual warning covers many areas. An incorrect wheel can affect bearing life, braking, handling, ground clearance, speedometer calibration, and even headlight aim. They conclude that wheels not meeting specifications “may fit poorly and result in damage to the vehicle or unusual handling and poor vehicle control.”
How to Measure Your Wheel’s Offset
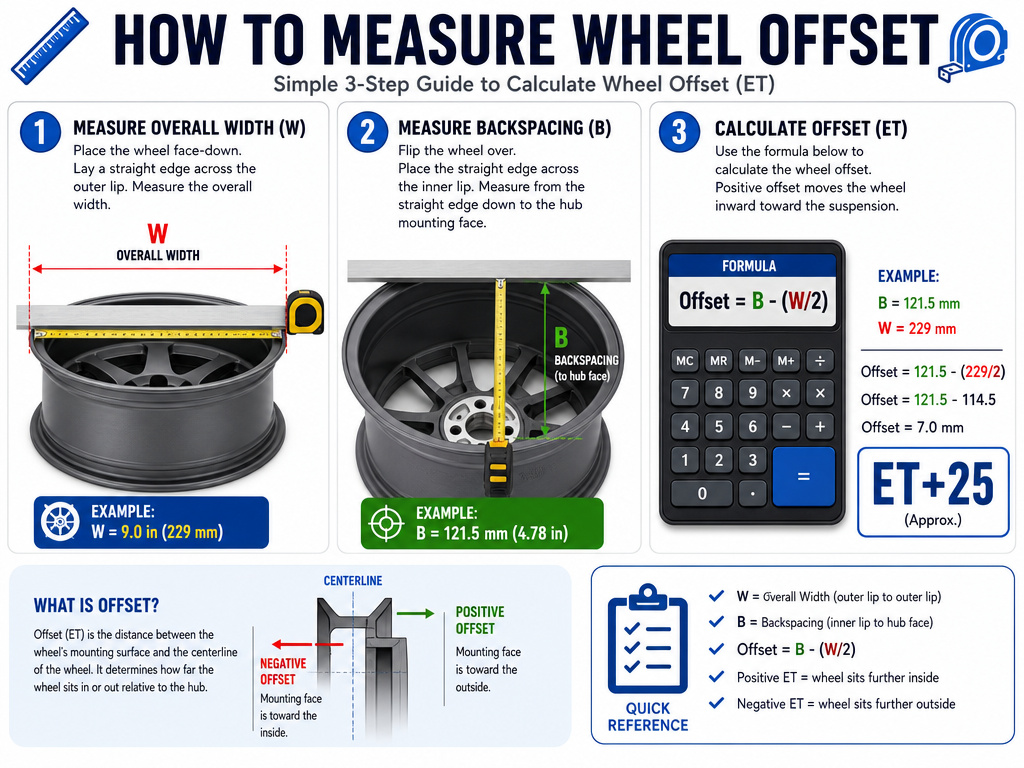
You need a flat surface, a straight edge long enough to span the wheel, a tape measure, and a calculator. A second pair of hands helps.
- Remove the wheel and lay it face-down. Ensure the valve stem is not interfering with the straight edge.
- Measure the overall width (W). Place the straight edge across the outer lips of the wheel. Measure the distance from the flat surface to the bottom of the straight edge. This is the overall width, not the bead-seat width. It’s close enough for this calculation.
- Measure the backspacing (B). Place the straight edge across the inner lips (the back of the wheel). Measure from the mounting hub face up to the straight edge. This is your backspacing.
- Calculate. First, find the centerline: W / 2. Then, apply the formula: Offset = Backspacing – Centerline.
Example: Your overall width (W) measures 10 inches (254 mm). Your backspacing (B) is 6 inches (152.4 mm). Centerline = 254 / 2 = 127 mm. Offset = 152.4 – 127 = +25.4 mm. You have an ET+25 wheel.
For a more precise measuring wheel backspacing, you can use a specialized tool, but the straight-edge method gets you within a couple of millimeters, which is often enough to identify an unmarked wheel.
Offset vs. Backspacing: What’s the Difference?
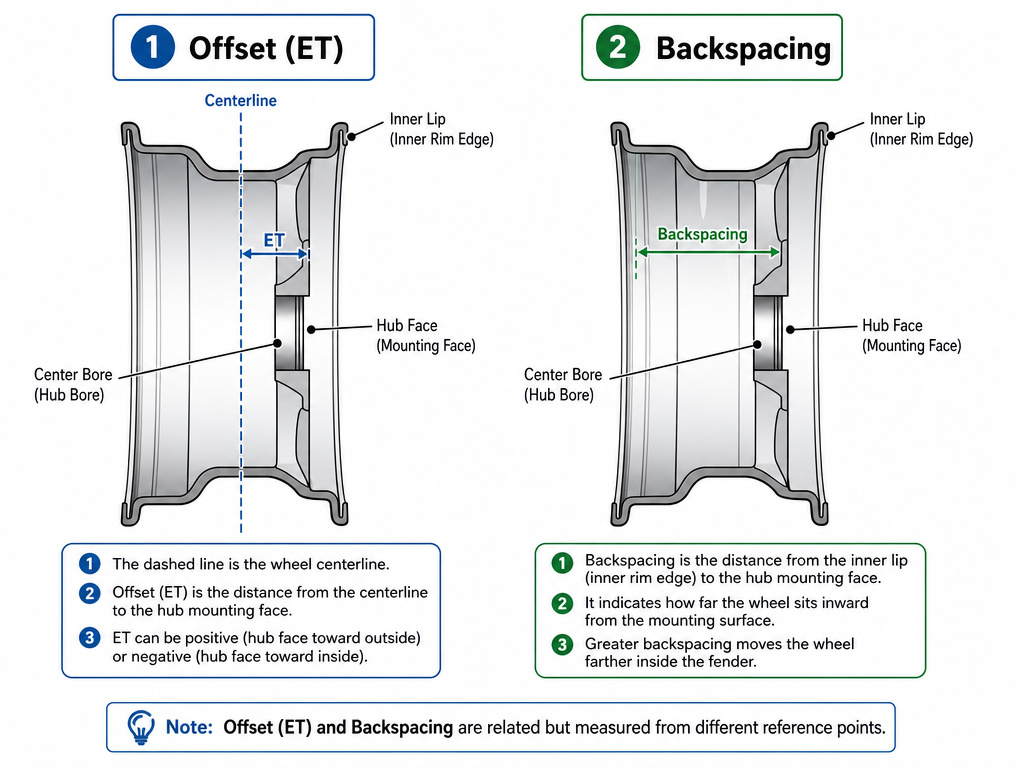
This is the classic point of confusion. They describe the same fitment from two different reference points.
- Offset is the distance from the centerline to the hub face. It’s measured in millimeters (ET). It isolates the hub position from the wheel width variable.
- Backspacing is the distance from the inner lip to the hub face. It’s measured in inches. It changes with wheel width.
This is why professionals work in offset. A 9-inch wheel and an 8-inch wheel with the same ET+35 have the same hub position relative to their own centerlines. But their backspacing is different because the inner lip is in a different place. Relying solely on backspacing without accounting for width is a sure way to get the fitment wrong. Our deep dive on offset vs backspacing covers the conversion formulas in detail.
Hubcentric vs. Lugcentric: The Centering Detail
Once you have the offset right, the wheel needs to be centered on the hub. There are two methods.
Hubcentric wheels have a center bore that matches the vehicle’s hub diameter exactly. The hub carries the weight and centers the wheel; the lug nuts just clamp it down. This is the modern standard for passenger vehicles. If an aftermarket wheel has a larger center bore, you use hub-centric rings (plastic, aluminum, or steel) to fill the gap and restore precise centering.
Lugcentric wheels (sometimes called stud piloted, an older design) rely on the conical seats of the lug nuts to center the wheel. The center bore is larger and doesn’t contact the hub. This is an older design, more common on trucks and some classic cars. The Wikipedia wheel sizing entry notes a community observation that plastic hub rings “only provide initial centering” and may not support the wheel during a high-speed pothole impact, recommending metal rings for strength.
Getting this wrong doesn’t change offset, but it causes vibration. The wheel isn’t perfectly centered, so it wobbles as it spins. You’ll feel it in the steering wheel at highway speeds—a shimmy that balancing won’t fix.
How to Choose the Right Offset
You don’t choose offset in a vacuum. You match it to your vehicle, desired wheel width, and tire size. Start with the factory spec on your door jamb placard or in the owner’s manual.
- Find your factory specs. Note the stock wheel width and offset.
- Use a reliable calculator. Input your stock specs and your proposed new wheel width and offset.
- It is advisable to stay within the offset limits allowed by the vehicle manufacturer for a conservative fit that likely avoids tire rubbing. When increasing width, you often need a lower (less positive) offset to push the inner barrel away from the strut.
- Test physically. Before committing, use a tread depth gauge or a slim ruler to measure the clearance between your current setup and the strut/fender at full lock. Subtract the calculated change in clearance to see if the new setup will fit.
- Consider spacers carefully. Wheel spacers effectively reduce offset (ET+35 with a 15mm spacer = effective ET+20). They can correct a tucked fitment but add stress to studs and bearings. For large corrections, buying the correct offset wheel is always the safer choice.
Your goal might be a flush fitment where the wheel face aligns with the fender. Our guide on flush, poke, and tucked wheel setups breaks down how to achieve each look safely. Remember, the Chinese national standard GB/T 3487-2024 and other international standards exist to ensure wheels are dimensionally consistent. A wheel that complies with SAE J2530 (aftermarket) or the stricter OEM standards will have a stamped offset that is trustworthy within about a millimeter.
Frequently Asked Questions
What does +35 offset mean?
+35 offset (ET+35) means the wheel’s hub mounting surface is 35 millimeters toward the outer face from the wheel’s centerline. This is a common positive offset that results in the wheel tucking inward toward the suspension components.
What does a +40 offset mean?
+40 offset is 5mm more positive than a +35 offset. This moves the wheel 5mm further inward. On the same width wheel, this provides 5mm more outer fender clearance but 5mm less inner suspension clearance.
Do I want a positive or negative offset?
You want the offset specified by your vehicle’s manufacturer for safe, predictable handling. Straying from this for aesthetics has trade-offs. Positive offset is standard for modern cars. Negative offset pushes wheels outward for a more aggressive look but increases stress on bearings and can cause rubbing.
What does +20 offset mean?
+20 offset is less positive (or “lower”) than a +35 offset. It moves the wheel 15mm further outward compared to the +35 wheel. This provides a fuller look in the wheel well but reduces clearance between the tire and the fender lip.
How much can I change my offset?
General safety guideline is to stay within the offset limits allowed by the vehicle manufacturer. Larger changes require meticulous clearance checking for both inner suspension components and outer fender lips. Aggressive changes affect steering feel, bearing wear, and safety systems like ABS.
Before You Go
When increasing wheel width, the inner barrel moves inward, which may require a lower offset than stock to maintain inner clearance. The math doesn’t lie—the inner barrel moves inward by half the width increase. That’s the first place to check, not the fender.
The stamped ET number is a contract. It tells you exactly where the wheel will live relative to your hub. A mismatch of a few millimeters is the difference between a clean install and a rotor cracking under stress. Measure what you have, calculate the change, and test the clearance before the tire is mounted. Your wheel bearings and your steering feedback will tell you if you got it right. Listen to them.
